
I just found this site that had great shortcuts for PSE check them out!
http://www.webdesignerwall.com/tutorials/photoshop-secret-shortcuts/
Showing posts with label tips. Show all posts
Showing posts with label tips. Show all posts
Monday, October 4, 2010

Sunday, September 12, 2010
Organizing with Picasa
2 posts in one day!...what can I say its been a long time. But with the three little ones and summer...its been crazy. Anyways...I made the move over to a mac from pc a month ago. I am still getting adjusted...I think the biggest change for me scrapbooking was moving from ACDSee to Picasa. ACDSee is beta on mac...and I didn't want to install a beta and risk all my organization not transferring once it was released. I also didn't want to wait forever to organize. Let me just say I am a HUGE ACDSee fan. I am a organizing fiend. I have to have everything in a certain place or it drives me crazy...so changing to a new organization style I did not take lightly. I researched lots of different options...and for me it came down to iPhoto and Picasa (everyone is different...this is just my opinions). In ACDSee I used categories to organize and didn't use the tag features and search that much. I just organized down to the detail with categories. With Picassa I didn't really have that choice (or iPhoto) for that matter. The two programs IMO are very similar. They both search quickly, use tags and you can create albums. The reason I choose Picasa instead of iPhoto was that you can search on color without tagging...which was huge for me not to have to tag all that stuff (as I did in ACDSee). The only thing I didn't like about Picasa was it was all single level for the albums...you can't have sub-albums.
How I organized Picasa to make it similar to my ACDSee style:
I have high level albums only (I use the create album using tag feature...love this!). So for example my main albums are: Kit Previews, alpha, design tools, embellishment, frame, image, journaling, paper, quick page, template
Then I have tons of tags off of these, I tag for example template, 2photo, square If I have a template that has 2 photos and is a 12x12 format. The more I tag the easier it is to find stuff. So now I can click on Kit Preview and see all my kit preview jpgs. Or I can search on 2photo and see all templates that are 2photos.
This way of searching is so fast! I have lots to still tag and just have been using this for a month but I like it a lot. Only thing that I had to go through and redo ...was I listed it 2 photo (with a space in between) it doesn't search well like that so I had to remove the space and tag them as 2photo. Otherwise it would pull anything with photo in the tag...make sense?
Anyway I hope this helps others as I searched like crazy and nothing that I could find organized the way I did in ACDSee so this way is at least similar so my brain can function :-)
How I organized Picasa to make it similar to my ACDSee style:
I have high level albums only (I use the create album using tag feature...love this!). So for example my main albums are: Kit Previews, alpha, design tools, embellishment, frame, image, journaling, paper, quick page, template
Then I have tons of tags off of these, I tag for example template, 2photo, square If I have a template that has 2 photos and is a 12x12 format. The more I tag the easier it is to find stuff. So now I can click on Kit Preview and see all my kit preview jpgs. Or I can search on 2photo and see all templates that are 2photos.
This way of searching is so fast! I have lots to still tag and just have been using this for a month but I like it a lot. Only thing that I had to go through and redo ...was I listed it 2 photo (with a space in between) it doesn't search well like that so I had to remove the space and tag them as 2photo. Otherwise it would pull anything with photo in the tag...make sense?
Anyway I hope this helps others as I searched like crazy and nothing that I could find organized the way I did in ACDSee so this way is at least similar so my brain can function :-)
Saturday, February 28, 2009
Quick Tip #6 - How to add Actions and organize them in PSE 7 Vista
Quick Tip #6 - How to add Actions and organize them in folders PSE 7 Vista
Here is a brief description of how to add actions and add custom organization.
1. To add an action...copy your *.atn and *.png files to C:\ProgramData\Adobe\Photoshop Elements\7.0\Photo Creations\photo effects
2. Create a *.metadata.xml file (I just copied on of the ones that were in there from another existing action and edited it. Make sure it is exactly the same name as your action.
*****Note the spacing, spelling and characters. You can specify any category (ie folder) you want.
3. Rebuild the database .... to do this...make sure PSE 7 is shutdown. Rename the following file:
C:\ProgramData\Adobe\Photoshop Elements\7.0\ThumbDatabase.db3
4. Restart PSE 7...now this will take sometime for it to restart...but then you should have a "folder" called Special Effects under your photo effects tab and it should have all your actions!
Here is a brief description of how to add actions and add custom organization.
1. To add an action...copy your *.atn and *.png files to C:\ProgramData\Adobe\Photoshop Elements\7.0\Photo Creations\photo effects
2. Create a *.metadata.xml file (I just copied on of the ones that were in there from another existing action and edited it. Make sure it is exactly the same name as your action.
*****Note the spacing, spelling and characters. You can specify any category (ie folder) you want.
3. Rebuild the database .... to do this...make sure PSE 7 is shutdown. Rename the following file:
C:\ProgramData\Adobe\Photoshop Elements\7.0\ThumbDatabase.db3
4. Restart PSE 7...now this will take sometime for it to restart...but then you should have a "folder" called Special Effects under your photo effects tab and it should have all your actions!
Thursday, February 26, 2009
My Quick Tips
Here is a collection of tips that I have found useful. I use PSE 7 (and still learning) so some may be applied to other PSE verisions.
Quick Tip #1 - How to change the appearance of PSE7 (from dark to light)
Quick Tip #2 - List of PSE short cut keys
Quick Tip #3 - How to remove object from background
Quick Tip #4 - Add a border around a photo
Quick Tip #5 - When adding actions, folders aren't showing up correctly
Quick Tip #6 - How to add Actions and organize them in PSE 7 on Vista
Quick Tip #1 - How to change the appearance of PSE7 (from dark to light)
Quick Tip #2 - List of PSE short cut keys
Quick Tip #3 - How to remove object from background
Quick Tip #4 - Add a border around a photo
Quick Tip #5 - When adding actions, folders aren't showing up correctly
Quick Tip #6 - How to add Actions and organize them in PSE 7 on Vista
Quick Tip #1 - How to Change the Apperance of PSE 7
Quick Tip #1 - How to change your PSE Application Color (PSE 7 specific)
In PSE 5 it was a very light Grey color and when I open up PSE 7 it is a very Dark Grey....if you want to change that....here's how:
1. Go to Edit....Preferences....General (or Cntrl + K)
2. Under the appearance options there is a slider. You can change the appearance of PSE by moving the slider to the perfered color choice of greys. (See screen shot below)
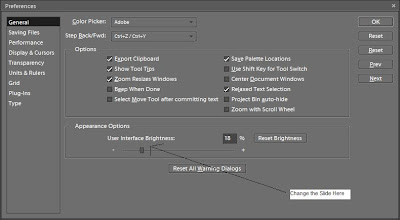
Hope this helps!

In PSE 5 it was a very light Grey color and when I open up PSE 7 it is a very Dark Grey....if you want to change that....here's how:
1. Go to Edit....Preferences....General (or Cntrl + K)
2. Under the appearance options there is a slider. You can change the appearance of PSE by moving the slider to the perfered color choice of greys. (See screen shot below)

Hope this helps!
Wednesday, February 18, 2009
Quick Tip #4 - Add a border around a photo
I learned this cool new trick to add a border around a photo.
With your photo selected, go to Edit> Stroke and a box will pop up where you can choose your stroke width (in pixels) and your color. When you click okay, there will be a line around your photo. I used 20 px. The color is selected by what is your "top" color in your color pallet.
To make the border in its own layer....make a new layer and with your new layer active, control>click on the thumbnail of your photo in the layers palette. This will bring up the "marching ants" around your photo. Then go through the same steps for making a stroke Edit>Stroke.
With your photo selected, go to Edit> Stroke and a box will pop up where you can choose your stroke width (in pixels) and your color. When you click okay, there will be a line around your photo. I used 20 px. The color is selected by what is your "top" color in your color pallet.
To make the border in its own layer....make a new layer and with your new layer active, control>click on the thumbnail of your photo in the layers palette. This will bring up the "marching ants" around your photo. Then go through the same steps for making a stroke Edit>Stroke.
Friday, September 12, 2008
How to Pop your Photos
I found this really great post on how to make your photos pop. It deals with opacity and layers and gives you some great ideas...check it out!
http://scrapmatters.com/wordpress/2008/09/12/pop-your-photos/
http://scrapmatters.com/wordpress/2008/09/12/pop-your-photos/
Thursday, July 17, 2008
Quick Tip #3 - Removing an element from your picture
Lets say you have an element in your picture that you do not want. You can use the clone stamp to remove it.
All you do is select the clone stamp tool then hit alt and click what you want to stamp over your picture and then "erase" your image. So if your picture was taken outside and you want to stamp over your element with grass...do the alt click on the grass then erase your image.
All you do is select the clone stamp tool then hit alt and click what you want to stamp over your picture and then "erase" your image. So if your picture was taken outside and you want to stamp over your element with grass...do the alt click on the grass then erase your image.
Quick Tip #2 - List of PSE Shortcuts
I am starting a list of PSE Shortcut keys for quick reference...as sometimes I forget :-) This list will continue to grow as I learn more.
Cntrl N - Creates a New File
Cntrl O - Opens a Existing File
Cntrl Z - Undo
Cntrl Y - Redo
Cntrl D - Deselect (this is helpful to get rid of the selection or marching ants)
Ctrl-Alt-Shift-N - Creates a new layer
Type D and it goes to your defaults (ie black and white color)
Cntrl-Shift-J when text box is selected justifies text
Cntrl N - Creates a New File
Cntrl O - Opens a Existing File
Cntrl Z - Undo
Cntrl Y - Redo
Cntrl D - Deselect (this is helpful to get rid of the selection or marching ants)
Ctrl-Alt-Shift-N - Creates a new layer
Type D and it goes to your defaults (ie black and white color)
Cntrl-Shift-J when text box is selected justifies text
Subscribe to:
Posts (Atom)



 Posts
Posts


