
Ok to load the brushes you can do it via:
Applications>Adobe>Photoshop Elements 8.0 >Presets>Brushes
Showing posts with label tutorials. Show all posts
Showing posts with label tutorials. Show all posts
Sunday, September 12, 2010

Installing Styles PSE8 on MAC
Here are the steps to installing Styles with PSE8 on a MAC:
You will need to copy the .xml and the .asl files both into the following folder:
From the top level MAC HD Folder --> Library>Application --> Support>Adobe>Photoshop Elements>8.0>Photo Creations>Layer Styles
If your style does not come with a .xml file you can copy one that is in the folder and rename it to the style you have...just delete out all the item stuff as you don't need that. Then rename the Mediadatabase.db3 to MediadatabaseOLD.db3 (that is located at Library\Application Support\Adobe\Photoshop Elements\8.0\Locale\ en-US).
Restart PSE8 and you should be all set!
You will need to copy the .xml and the .asl files both into the following folder:
From the top level MAC HD Folder --> Library>Application --> Support>Adobe>Photoshop Elements>8.0>Photo Creations>Layer Styles
If your style does not come with a .xml file you can copy one that is in the folder and rename it to the style you have...just delete out all the item stuff as you don't need that. Then rename the Mediadatabase.db3 to MediadatabaseOLD.db3 (that is located at Library\Application Support\Adobe\Photoshop Elements\8.0\Locale\ en-US).
Restart PSE8 and you should be all set!
Installing Actions PSE8 MAC
Great Resource for installing actions on Mac:
http://www.texaschicksblogsandpics.com/photography-page/installing-actions-in-photoshop-elements/install-actions-in-photoshop-elements-8-on-mac/
Also, if you are wanting to organize them in "folders" then check out the following on how to modify the metadata.xml file associated with each action:
http://www.texaschicksblogsandpics.com/organize-actions-by-category-in-pse-7-and-8-free-template/
http://www.texaschicksblogsandpics.com/photography-page/installing-actions-in-photoshop-elements/install-actions-in-photoshop-elements-8-on-mac/
Also, if you are wanting to organize them in "folders" then check out the following on how to modify the metadata.xml file associated with each action:
http://www.texaschicksblogsandpics.com/organize-actions-by-category-in-pse-7-and-8-free-template/
Sunday, June 13, 2010
Using Doodles to create pages
Ive been on the hunt to try and figure out how to use thoes cute doodle brushes to make my own paper. I found the following tutorial with some useful info:
Doodle Overlay
Doodle Overlay
Saturday, June 12, 2010
Brushes Tutorials
I came across this site that had great tutorials on brushes!
http://vandelaydesign.com/blog/design/tutorials-photoshop-brushes/
http://vandelaydesign.com/blog/design/tutorials-photoshop-brushes/
Tuesday, March 2, 2010
New Tutorial Sites I want to check out
In my searches I found some new tutorial sites I want to check into further:
http://emptyeasel.com/art-tutorials/photoshop-tricks/
http://www.absolutecross.com/tutorials/photoshop/
http://blog.lorrifreedman.com/
http://emptyeasel.com/art-tutorials/photoshop-tricks/
http://www.absolutecross.com/tutorials/photoshop/
http://blog.lorrifreedman.com/
Adding Color to Black and White photo in photoshop
So I was searching around and found some cool sites that gave tutorials on how to add color back into a black and white photo. Check out the following:
http://www.astahost.com/info.php/Photoshop-Tutorial-Adding-Color-Black-White-Photo_t7741.html
http://emptyeasel.com/2008/04/29/how-to-add-color-to-black-and-white-photos-in-photoshop/
http://www.absolutecross.com/tutorials/photoshop/photos/colorizing/
http://blog.lorrifreedman.com/index.php/2008/09/24/bringing-color-back/
http://www.astahost.com/info.php/Photoshop-Tutorial-Adding-Color-Black-White-Photo_t7741.html
http://emptyeasel.com/2008/04/29/how-to-add-color-to-black-and-white-photos-in-photoshop/
http://www.absolutecross.com/tutorials/photoshop/photos/colorizing/
http://blog.lorrifreedman.com/index.php/2008/09/24/bringing-color-back/
Saturday, February 13, 2010
Good site for tutorials
Here is a good site for tutorials I found for PSE:
http://scrapbook-bytes.com/cgi-script/tutorials/publish/index.shtml
Check it out :-)
http://scrapbook-bytes.com/cgi-script/tutorials/publish/index.shtml
Check it out :-)
Wednesday, March 4, 2009
How to Make Scalloped Edges
Hi All,
I was interested in scalloped edges in a layout and decided to do some research and figure out some ways to accomplish this.
I found some great tutorials:
http://spraguelab.squarespace.com/blog/2007/2/2/photoshop-friday-2007-5-scalloped-edges.html
http://www.twopeasinabucket.com/cg_display.asp?seed_id=21822
Have fun!
I was interested in scalloped edges in a layout and decided to do some research and figure out some ways to accomplish this.
I found some great tutorials:
http://spraguelab.squarespace.com/blog/2007/2/2/photoshop-friday-2007-5-scalloped-edges.html
http://www.twopeasinabucket.com/cg_display.asp?seed_id=21822
Have fun!
Saturday, February 28, 2009
Organizing Brushes in PSE 7...creating your own abr file
How I organize my Custom Brushes
I save all my brushes under Photoshop Elements folder, because I want them to load automatically to see what I have. The problem I found was, even if I organized my brushes into folders, when I went to PSE they were all listed (and not organized into folders...like the default ones). So, I found that if I created my own .abr file with all the brushes located in each folder...I could then have a "organized" brush selection. So here is how I do it:
1. Organize your custom brushes in a folder that is NOT:
C:\Program Files\Adobe\Photoshop Elements 7.0\Presets\Brushes
(I chose to do it on my EHD)
Here is a screen capture of what mine looks like: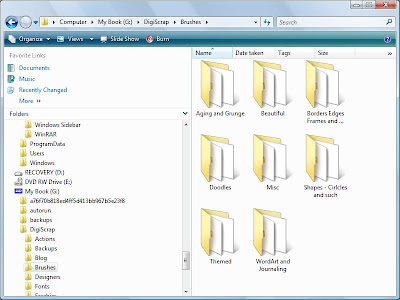 2. Then open up PSE go to Edit >Preset Manager
3. Load the brushes you want to be in your custom .abr file i.e. Folder/Collection
4. Hold down Cntrl Key and click on each one that you want in your new collection
(You will see that the ones selected now have a darker line around each one of them)
5. Now Click on Save set
6. Type in the name you want them to be (Don't use the name of an existing brush set)
7. You will not be able to see the brush set until you restart Elements so close it down and restart it.
This tutorial is based off of the instructions found here
I save all my brushes under Photoshop Elements folder, because I want them to load automatically to see what I have. The problem I found was, even if I organized my brushes into folders, when I went to PSE they were all listed (and not organized into folders...like the default ones). So, I found that if I created my own .abr file with all the brushes located in each folder...I could then have a "organized" brush selection. So here is how I do it:
1. Organize your custom brushes in a folder that is NOT:
C:\Program Files\Adobe\Photoshop Elements 7.0\Presets\Brushes
(I chose to do it on my EHD)
Here is a screen capture of what mine looks like:
 2. Then open up PSE go to Edit >Preset Manager
3. Load the brushes you want to be in your custom .abr file i.e. Folder/Collection
4. Hold down Cntrl Key and click on each one that you want in your new collection
(You will see that the ones selected now have a darker line around each one of them)
5. Now Click on Save set
6. Type in the name you want them to be (Don't use the name of an existing brush set)
7. You will not be able to see the brush set until you restart Elements so close it down and restart it.
This tutorial is based off of the instructions found here
Thursday, February 26, 2009
Quick Tip #1 - How to Change the Apperance of PSE 7
Quick Tip #1 - How to change your PSE Application Color (PSE 7 specific)
In PSE 5 it was a very light Grey color and when I open up PSE 7 it is a very Dark Grey....if you want to change that....here's how:
1. Go to Edit....Preferences....General (or Cntrl + K)
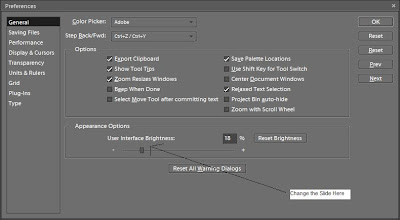
2. Under the appearance options there is a slider. You can change the appearance of PSE by moving the slider to the perfered color choice of greys. (See screen shot below)
Hope this helps!

In PSE 5 it was a very light Grey color and when I open up PSE 7 it is a very Dark Grey....if you want to change that....here's how:
1. Go to Edit....Preferences....General (or Cntrl + K)
2. Under the appearance options there is a slider. You can change the appearance of PSE by moving the slider to the perfered color choice of greys. (See screen shot below)

Hope this helps!
Friday, September 12, 2008
How to Pop your Photos
I found this really great post on how to make your photos pop. It deals with opacity and layers and gives you some great ideas...check it out!
http://scrapmatters.com/wordpress/2008/09/12/pop-your-photos/
http://scrapmatters.com/wordpress/2008/09/12/pop-your-photos/
Subscribe to:
Posts (Atom)



 Posts
Posts


