Found a great tutorial on installing Layer Styles in PSE7 on Vista.....
HERE
Saturday, February 28, 2009
Organizing Brushes in PSE 7...creating your own abr file
How I organize my Custom Brushes
I save all my brushes under Photoshop Elements folder, because I want them to load automatically to see what I have. The problem I found was, even if I organized my brushes into folders, when I went to PSE they were all listed (and not organized into folders...like the default ones). So, I found that if I created my own .abr file with all the brushes located in each folder...I could then have a "organized" brush selection. So here is how I do it:
1. Organize your custom brushes in a folder that is NOT:
C:\Program Files\Adobe\Photoshop Elements 7.0\Presets\Brushes
(I chose to do it on my EHD)
Here is a screen capture of what mine looks like: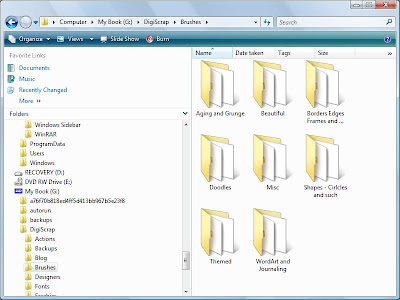 2. Then open up PSE go to Edit >Preset Manager
3. Load the brushes you want to be in your custom .abr file i.e. Folder/Collection
4. Hold down Cntrl Key and click on each one that you want in your new collection
(You will see that the ones selected now have a darker line around each one of them)
5. Now Click on Save set
6. Type in the name you want them to be (Don't use the name of an existing brush set)
7. You will not be able to see the brush set until you restart Elements so close it down and restart it.
This tutorial is based off of the instructions found here
I save all my brushes under Photoshop Elements folder, because I want them to load automatically to see what I have. The problem I found was, even if I organized my brushes into folders, when I went to PSE they were all listed (and not organized into folders...like the default ones). So, I found that if I created my own .abr file with all the brushes located in each folder...I could then have a "organized" brush selection. So here is how I do it:
1. Organize your custom brushes in a folder that is NOT:
C:\Program Files\Adobe\Photoshop Elements 7.0\Presets\Brushes
(I chose to do it on my EHD)
Here is a screen capture of what mine looks like:
 2. Then open up PSE go to Edit >Preset Manager
3. Load the brushes you want to be in your custom .abr file i.e. Folder/Collection
4. Hold down Cntrl Key and click on each one that you want in your new collection
(You will see that the ones selected now have a darker line around each one of them)
5. Now Click on Save set
6. Type in the name you want them to be (Don't use the name of an existing brush set)
7. You will not be able to see the brush set until you restart Elements so close it down and restart it.
This tutorial is based off of the instructions found here
Quick Tip #6 - How to add Actions and organize them in PSE 7 Vista
Quick Tip #6 - How to add Actions and organize them in folders PSE 7 Vista
Here is a brief description of how to add actions and add custom organization.
1. To add an action...copy your *.atn and *.png files to C:\ProgramData\Adobe\Photoshop Elements\7.0\Photo Creations\photo effects
2. Create a *.metadata.xml file (I just copied on of the ones that were in there from another existing action and edited it. Make sure it is exactly the same name as your action.
*****Note the spacing, spelling and characters. You can specify any category (ie folder) you want.
3. Rebuild the database .... to do this...make sure PSE 7 is shutdown. Rename the following file:
C:\ProgramData\Adobe\Photoshop Elements\7.0\ThumbDatabase.db3
4. Restart PSE 7...now this will take sometime for it to restart...but then you should have a "folder" called Special Effects under your photo effects tab and it should have all your actions!
Friday, February 27, 2009
PSE 7 - Crashes on Building Content and Effects
Okay...as I am adding actions I broke PSE :-( But I fixed it...
It kept crashing trying to build the db for the new actions I added. So to fix it I renamed the preferance file...located in C:\Users\\AppData\Roaming\Adobe\Photoshop Elements\7.0\Editor
I just renamed it with a .old while PSE was closed. That seemed to fix it...so now Im on to trying to add back my actions.
Wish me luck
It kept crashing trying to build the db for the new actions I added. So to fix it I renamed the preferance file...located in C:\Users\
I just renamed it with a .old while PSE was closed. That seemed to fix it...so now Im on to trying to add back my actions.
Wish me luck
Quick Tip #5 - Actions Not showing up in folders correctly
Quick Tip #5 - Actions Not showing up in folders correctly (PSE7)
Ok...as I work through PSE 7 I am in the process of installing my actions. I followed the directions listed HERE to do so. I also created XML files for each action so I could group them. For instance I have several CoffeeShop actions so I created a folder for them. So, I found out a couple things.....
1. You can't have _ in the name it didn't pick them up (even after I rebooted).
2. My folders weren't getting picked up and they were putting them all in the wrong spots....so here is what I did.
- You have to rebuild the ThumbDatabase.db3 file...on vista it is located:
C:\ProgramData\Adobe\Photoshop Elements\7.0
- To rebuild...just make sure PSE 7 is shut down and rename the file to ThumbDatabase1.db3
- When you restart PSE 7 you will notice that a new file is created and this should fix the problem.
Hope this helps!
Thursday, February 26, 2009
My Quick Tips
Here is a collection of tips that I have found useful. I use PSE 7 (and still learning) so some may be applied to other PSE verisions.
Quick Tip #1 - How to change the appearance of PSE7 (from dark to light)
Quick Tip #2 - List of PSE short cut keys
Quick Tip #3 - How to remove object from background
Quick Tip #4 - Add a border around a photo
Quick Tip #5 - When adding actions, folders aren't showing up correctly
Quick Tip #6 - How to add Actions and organize them in PSE 7 on Vista
Quick Tip #1 - How to Change the Apperance of PSE 7
Quick Tip #1 - How to change your PSE Application Color (PSE 7 specific)
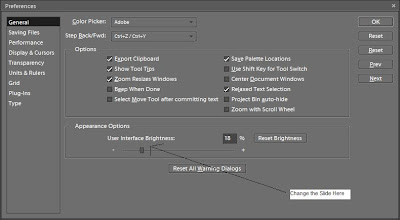
In PSE 5 it was a very light Grey color and when I open up PSE 7 it is a very Dark Grey....if you want to change that....here's how:
1. Go to Edit....Preferences....General (or Cntrl + K)
2. Under the appearance options there is a slider. You can change the appearance of PSE by moving the slider to the perfered color choice of greys. (See screen shot below)
Hope this helps!

In PSE 5 it was a very light Grey color and when I open up PSE 7 it is a very Dark Grey....if you want to change that....here's how:
1. Go to Edit....Preferences....General (or Cntrl + K)
2. Under the appearance options there is a slider. You can change the appearance of PSE by moving the slider to the perfered color choice of greys. (See screen shot below)

Hope this helps!
Wednesday, February 25, 2009
ACDSee
Hi All,
I just wanted to post a wonderful website of tutorials that I used when first setting up my digiscrap organization system. I tried using PSE organizer...it just got too bogged down so I went to ACDSee based on lots of recommendations.
http://www.digiscrapinfo.com/joomla/acdsee-photo-manager/tutorials
Hope this helps
Monday, February 23, 2009
Baby Book :-)
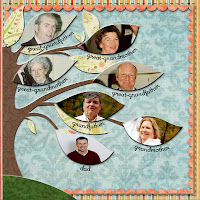
Well, I have now officially caught up on my 2009 layouts and now I am working on my baby book for our little boy who is due soon. I thought I would get a head start on it. For my other two girls I have done a traditional baby book and a scrapbook for the 1st year...but for this little guy I decided to combine it all into one digital book. I am so excited to see how it all turns out.
Template: Scrapgirls Baby Book
Papers: I believe most of them came from http://www.shabbyprincess.com/
Here are a couple layouts that I have done:


Template: Scrapgirls Baby Book
Papers: I believe most of them came from http://www.shabbyprincess.com/
Wednesday, February 18, 2009
Quick Tip #4 - Add a border around a photo
I learned this cool new trick to add a border around a photo.
With your photo selected, go to Edit> Stroke and a box will pop up where you can choose your stroke width (in pixels) and your color. When you click okay, there will be a line around your photo. I used 20 px. The color is selected by what is your "top" color in your color pallet.
To make the border in its own layer....make a new layer and with your new layer active, control>click on the thumbnail of your photo in the layers palette. This will bring up the "marching ants" around your photo. Then go through the same steps for making a stroke Edit>Stroke.
Saturday, February 14, 2009
New Layout
Well, Im finally on 2009 layouts so I thought I would post the first layout I did.
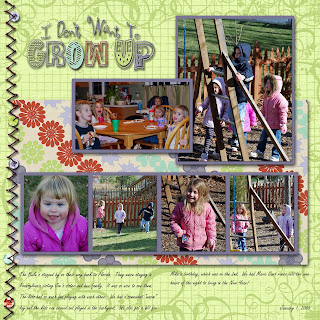

credits: template - purple tulip designs
kit - rachel bobell designs - Inner Child
kit - rachel bobell designs - Inner Child
Great Sites for Freebies
This post is going to be a continual work in progress. I am in the process of collecting sites that I like for freebies. These usually are kits or templates.
http://www.scrapandrea.com/ - Great site for templates
http://digifree.blogspot.com/ - this is a search engine that pulls all kinds of freebies
http://coffeeteaphotography.blogspot.com/ - PSE Actions
http://ikeagoddess.blogspot.com/ - This is a great site that shows freebies :-)
http://www.moriginalsblog.com/ - Great site for templates
http://www.purpletulipdesigns.blogspot.com/ - this has great templates and occasional kits
http://www.shabbyprincess.com/ - Great Freebie Kits!
http://thescrappincop.blogspot.com/search/label/freebies - brushes and paper templates
http://jencaputo.typepad.com/ - templates
Thursday, February 12, 2009
Had to share

Hi All,
I am in the process of working on my December layouts and I used one of the CoffeeShop actions for this photo and just loved it...had to share :-)
Wednesday, February 11, 2009
New Look and a layout
Hi All,
Well I have been busy. I updated my blog with this cool new template from sweet shoppe. It had all the images already created for me, I just had to modify the code. It came with the code modification instructions, but they really didn't work that well for me. It came back with errors...so I had to go line by line in the code...boy was that fun :-( I still have to get the post separator to work...as I kind of gave up on that for now.
I also finished a layout so thought I would post it. I am almost through December. I am trying to get caught up before baby #3 arrives...also would like to get started on the baby book...as I am doing it all digital this time around :-)

Credits:
- Template is a freebie by Moriginals (www.moriginals.blogspot.com) It is the August template...but I made some modifications
- Kit is Merry by "designs by krista" freebie.
Tuesday, February 10, 2009
Update
Hi All,
Its been a while since I have posted anything. I am thinking about re-energizing my blog. I will have to figure out how to do it. I have been working on my scrapbook layouts to catch up and also made some birthday cards for my daughter...I will have to post them later. I am trying to figure out what I should do with this blog and what direction I should go...or maybe it will just be a Hodge-podge of stuff....
Its been a while since I have posted anything. I am thinking about re-energizing my blog. I will have to figure out how to do it. I have been working on my scrapbook layouts to catch up and also made some birthday cards for my daughter...I will have to post them later. I am trying to figure out what I should do with this blog and what direction I should go...or maybe it will just be a Hodge-podge of stuff....
Subscribe to:
Posts (Atom)